What a Posting Toy Is Before You Cut Anything
A posting toy is a closed container with a deliberate opening that a child pushes an object through so the piece leaves sight and can immediately be brought back into view. That definition rests on a closed mechanical loop. If a container acts as a one-way trap where blocks vanish without an obvious return path, toddlers quickly abandon the box.
Five distinct physical actions make up this posting loop: hold, carry, line the object up with the target, release it, and look for its return. Timing governs whether the loop holds a child's attention. When a block drops out of sight, an early learner can lose focus if the retrieval door stays shut.
The build covered here strips the mechanism down to its safest baseline: one sturdy corrugated shipping carton paired with hardwood blocks too large to pose a choking hazard, assembled by an adult for supervised floor play. Every cut, flap, and tape seam serves that five-part motor sequence.
Why a Carton and Fist-Sized Blocks Match Early Aim
Pushing a wooden block into a dark slot sits right at the intersection of cause-and-effect experimentation and object permanence. The child initiates a physical disappearance and verifies that the hidden wooden cube still exists when the side door swings open. Readiness for this kind of developmental play depends on a child's physical ability to sit stably, hold a large block, and release it voluntarily rather than a fixed chronological age, and this setup serves as play guidance rather than a developmental assessment.
A corrugated carton works better as a first container than heavy wooden commercial boxes because it is light, familiar, replaceable, and effortless for an adult to unlatch on the fly. Where you place the hole changes the biomechanics of the reach. Positioning the opening on the vertical side panel 15 to 20 centimeters off the floor matches the chest height of a seated toddler. From that posture, a child reaches forward with a stable elbow and neutral wrist. A top-lid drop, by contrast, forces the toddler to lift the shoulder and flex the wrist downward, which regularly causes the bottom edge of the block to strike the cardboard rim rather than fall inside.
Oversized blocks solve the grip problem at the same time. A block measuring 55 to 65 millimeters across the face fills a whole-hand palmar grasp without encouraging premature finger-pinching. The wide cube gives the child a highly visible target edge to align against the carton face, and its bulk ensures the piece cannot slip through a tiny gap by accident.
A Box and Blocks That Stay Too Big to Swallow

We initially tested thick cereal boxes and shoeboxes because they were easy to cut with household scissors, but discarded them after floor play showed that saliva softened the single-ply paperboard into tearable, mouthable scraps. Thin mailers and tissue boxes fail the same way, collapsing inward the moment a toddler leans a forearm against the top edge.
To prevent wall collapse when leaned on, the container must be a shipping carton made of minimum 3-millimeter single-wall corrugated cardboard (standard C-flute) carrying a 32 ECT (Edge Crush Test) rating. Inspect the box before committing to the build:
- Flap integrity: All four top and bottom flaps must meet cleanly so three sides can be sealed tight while one end acts as a hinged retrieval door.
- Surface safety: Reject any box with a die-cut plastic display window, exposed metal stitching staples along the seams, or loose plastic shipping tape that fingers can peel up.
- Block material: Use unfinished hardwood or soundly finished solid pieces free of splinters, deep grain cracks, or flaking paint.
Every block used in supervised floor play must exceed the federal small-parts rule for toys intended for children under three. Under the 16 CFR Part 1501 standard, any test object is hazardous if it fits entirely within a truncated cylinder measuring 31.7 millimeters (1.25 inches) in diameter with a sloped depth between 25.4 and 57.1 millimeters (1.0 to 2.25 inches). A 16 CFR Part 1501 small-parts cylinder check differs from commercial product drop-testing. Verifying at home that a 60-millimeter wooden block cannot enter a choke tube confirms basic initial sizing, whereas commercial product testing can include impact tests to assess whether pieces fracture into smaller shards. Because home builders aren't running impact machines, selecting dense, knot-free hardwood blocks and inspecting them before each session is mandatory.
Cutting a Slot the Block Can Clear Without Jamming
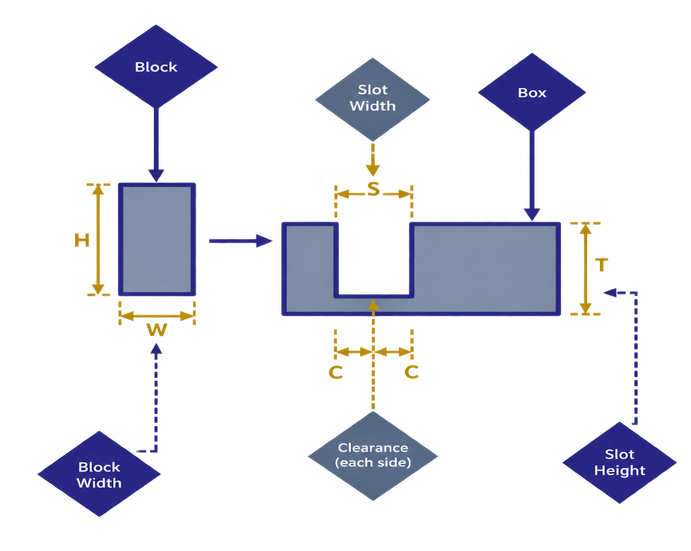
Getting a hand-held block through a vertical cardboard wall without frustrating jams requires a three-part geometry check: block face, clearance margin, and tape-wrapped rim thickness.
Setting the clearance margin around the traced block requires balancing two distinct mechanical failure modes. Tight margins can cause wooden blocks to wedge sideways against the inner corrugation flutes whenever a child pushes the piece in at a slight upward or sideways angle. At the other extreme, overly wide margins can allow the child's whole hand to follow the block inside the carton and get stuck against the cardboard edge.
Adding 6 to 10 millimeters of extra clearance to each side of the traced block profile allows room for angled pushes to drop cleanly. Once the slot is cut, binding the raw corrugated edge with 48-millimeter-wide cloth gaffer or bookbinding tape—folded equally with 24 millimeters outside and 24 millimeters inside—seals loose fibers and adds structural stiffness to the rim. That tape wrap slightly narrows the raw cutout, which is why the initial blade line must account for both the wood profile and the cloth binding.
Adult Blade Protocol
Keep all cutting strictly adult-only with the child completely out of the room. Use a metal straightedge and a sharp utility knife on a self-healing mat, then store the blade before bringing the carton to the floor. Attach a 5-centimeter folded tape tab to the single unsealed end flap so you can pull the retrieval door open with one hand while supporting the box with the other.
Widening Success First, Then Tightening the Slot
How does a toddler transition from clumsy drops to precise spatial orientation? You start by rigging the geometry for effortless early wins, then gradually narrow the tolerances once the motor pathway is established.
Begin the first session with a single block and the full, generous opening. Post the block once yourself while the child watches, pull the 5-centimeter tape tab on the end door, let the block tumble back into view, and wait. Spoken language during this focused repetition should stay stripped down to four anchor words maximum: "in," "push," "gone," and "back." Spoken individually, these short verbs frame the action as an invitation without interrupting the child's motor concentration with a quiz or a verbal lesson plan.
Once upright drops succeed repeatedly without rim collisions, you do not need to build a second box to increase the challenge. Instead, cut a heavy card frame and tape it directly over the original opening to shrink the clearance by 3 to 4 millimeters per side. This modification tightens the spatial requirement while preserving the familiar carton the child already trusts. You can also introduce a rectangular block that shares the same safe cross-section on its narrow end, requiring the child to rotate the wrist so the piece aligns with the slot before pushing.
One Kitchen-Table Build You Can Copy This Afternoon
Standardizing this build around a forearm-length shipping carton and three identical blocks eliminates the need to measure multiple slot geometries.
Materials and Dimensions
- Carton: One clean 32 ECT single-wall corrugated shipping box measuring 30 by 20 by 20 centimeters.
- Blocks: Three unfinished hardwood cubes measuring 60 by 60 by 60 millimeters, sanded smooth with zero finish that could flake.
- Tape and Tools: One roll of 48-millimeter-wide cloth gaffer tape, a metal ruler, a pencil, and a utility knife.
Step-by-Step Assembly
- Clear the kitchen table and lay the carton flat. Tape the entire bottom seam and three of the top flaps shut using the 48-millimeter cloth tape, leaving one 20-by-20-centimeter end flap unsealed to serve as the retrieval door.
- Fold a 10-centimeter strip of cloth tape over the outer edge of the unsealed door flap to create a sturdy 5-centimeter pull tab.
- Stand the carton on its 30-by-20-centimeter base. On the vertical 30-by-20-centimeter side face, use the ruler and pencil to center a 70-by-70-millimeter square positioned 15 centimeters up from the bottom edge (matching the 60-millimeter block face plus 5 millimeters of clearance on all four sides before taping).
- Score along the pencil lines against the metal ruler with the utility knife until the cardboard square drops free. Put the knife away out of reach.
- Cut four strips of 48-millimeter cloth tape and wrap the raw square rim, folding 24 millimeters onto the outer face and 24 millimeters onto the inner wall. This yields a smooth, reinforced finished opening measuring approximately 68 by 68 millimeters—preserving an 8-millimeter total clearance margin around the 60-millimeter cube.
- Drop-test all three hardwood blocks through the vertical slot at slight angles to verify they clear the inner corrugation flutes without wedging.
The First Five Minutes on the Floor
For example, a parent sets the finished carton on the rug with the vertical slot facing their seated child and the hinged end door facing their knees. The three hardwood blocks sit in a small pile on the child's dominant-hand side. The parent picks up one cube, aligns it slowly with the 68-by-68-millimeter taped rim, pushes it through while saying "in," and immediately pulls the 5-centimeter end tab to swing the door open. They point to the cube resting inside, say "back," set it beside the carton, and close the flap. The child takes the second block and works out the angle while the parent waits, opening the retrieval door as soon as the wood hits the floor inside.